
Food Photography is all about mastering light. Without a great light you can’t take good pictures – absorb that! I chase light like a butterfly chases after pollen. Every light has a story to tell! So look at the things around you and enjoy the play of light. I am telling you, it’s quite enchanting. I love to capture photographs in early morning and evening light (golden hour) mostly.
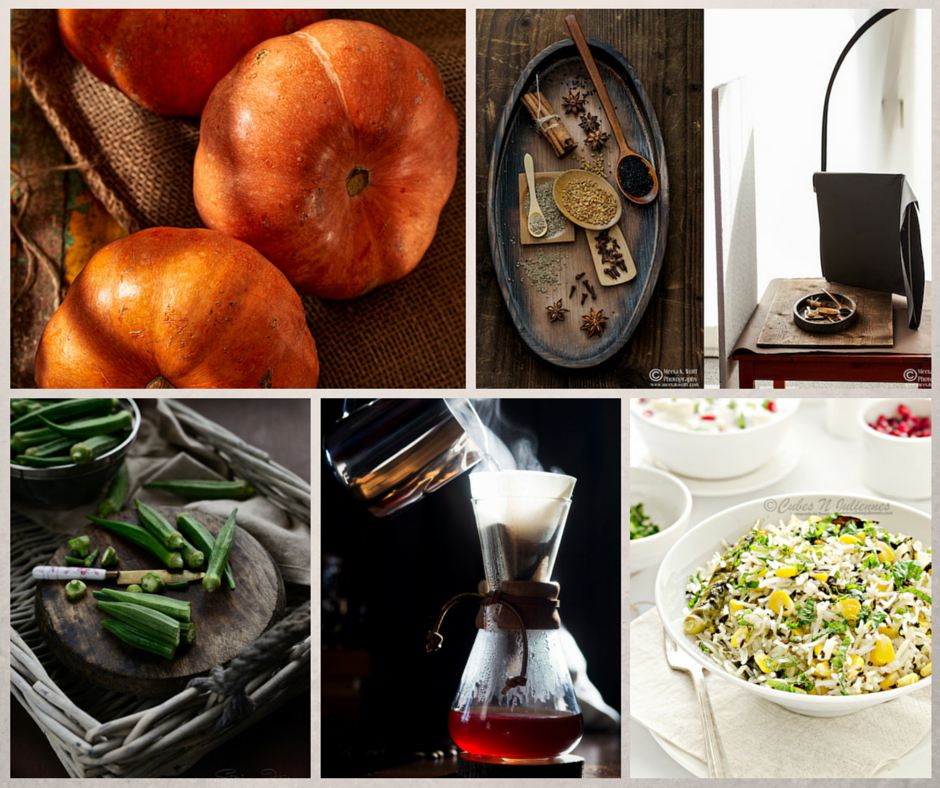
Photos taken by before 10 am.
Around Mid-day
Golden Hour

I am not a great Photographer – however I decided to capture my food photography workflow in case anyone is interested.
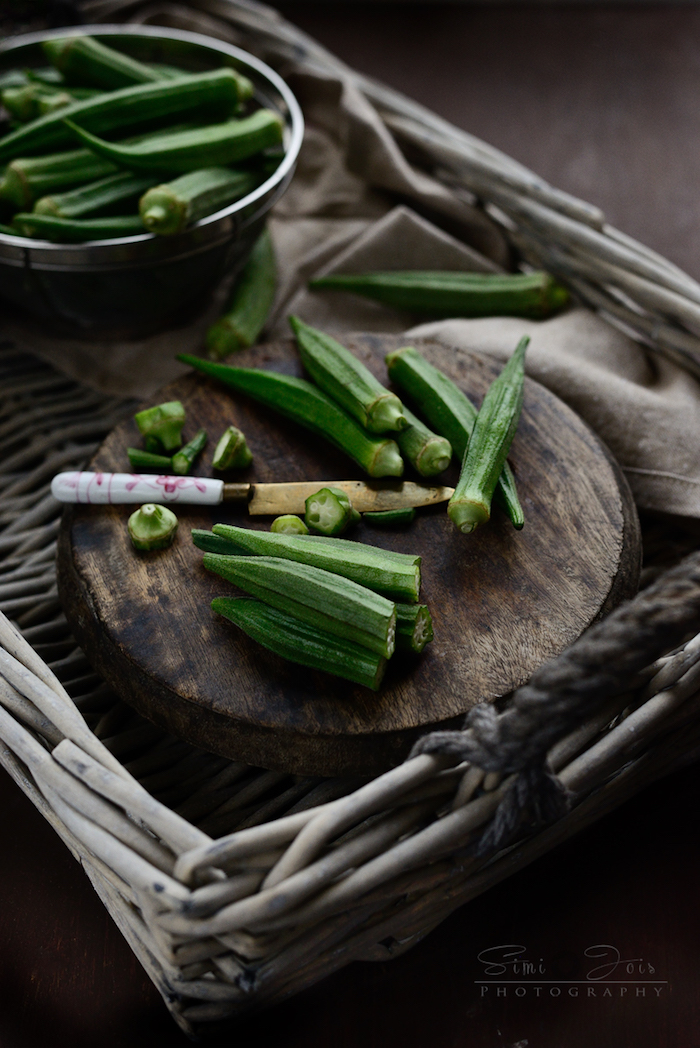
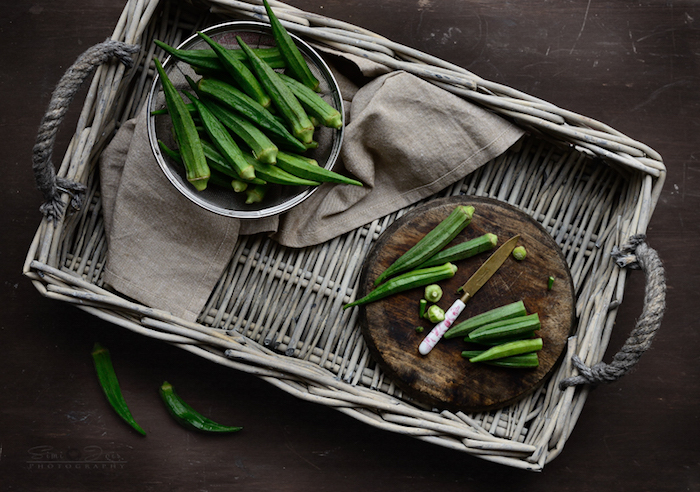
I worked with direct morning sunlight (before 10am) when I have created these shots. In all these shots, morning sunlight is coming through my east facing small windows and I have created shadows and drama by placing them properly in the path of sun.
[ezcol_1half]
 [/ezcol_1half][ezcol_1half_end]
 [/ezcol_1half_end]
[ezcol_1half]
 [/ezcol_1half][ezcol_1half_end]
[/ezcol_1half_end] Most of the times I work near my north facing windows where I have some linen curtains. When we got our place, we did not know I would be converting our living room into a studio – so we got blinds for the window. But later I realized that I am using a portable sheer curtain on my window very often, so this year we have decided to invest on some sheer linen curtains.
Light is much softer and subtle through them.
There are 3 approaches I take while shooting – which I learned by trial and error. In all these cases I have used shiny silver color reflector (works as mirror) whenever needed.
- Backlight approach: Here light is coming from the back so in order to light my subject I use a lot of reflector or mirror. In my opinion backlight creates some amazing highlights but it’s hard to light the subject if it’s sitting in the front.
- Sidelight approach: The best! It’s really not that creative but works well when you’re just trying to capture the subject and it’s gory details. I rarely needed a reflector while shooting like this.
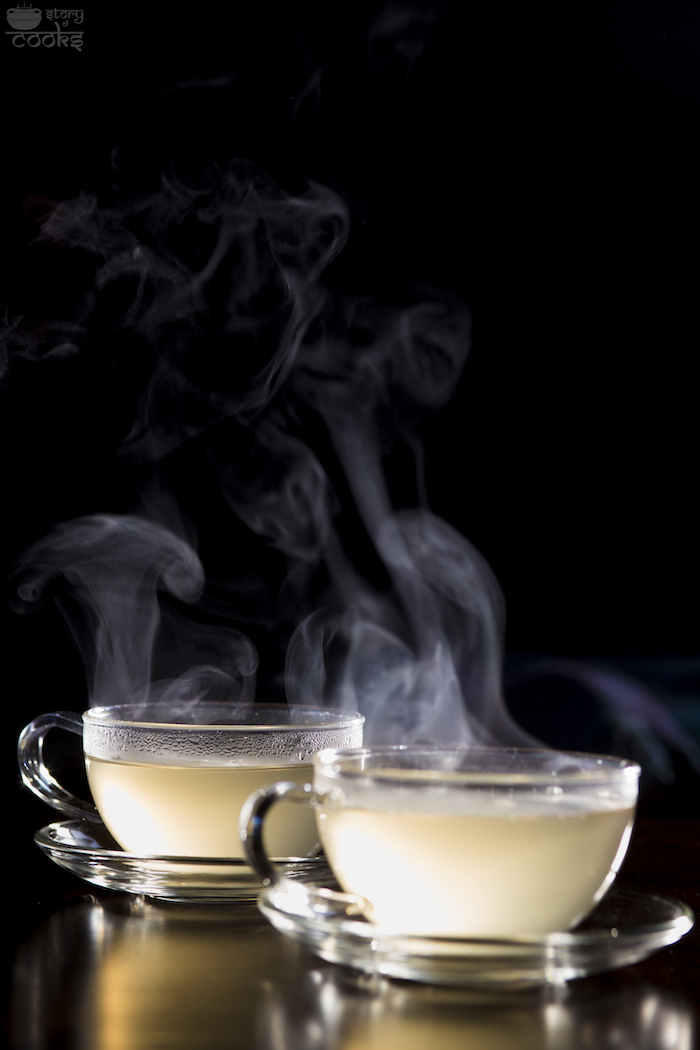
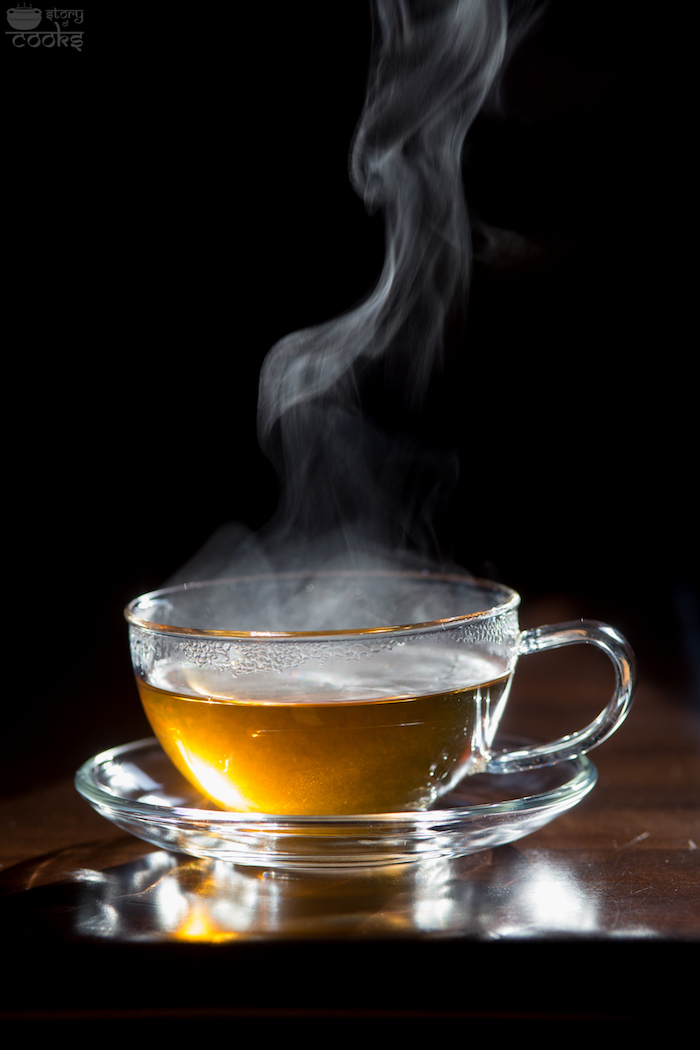
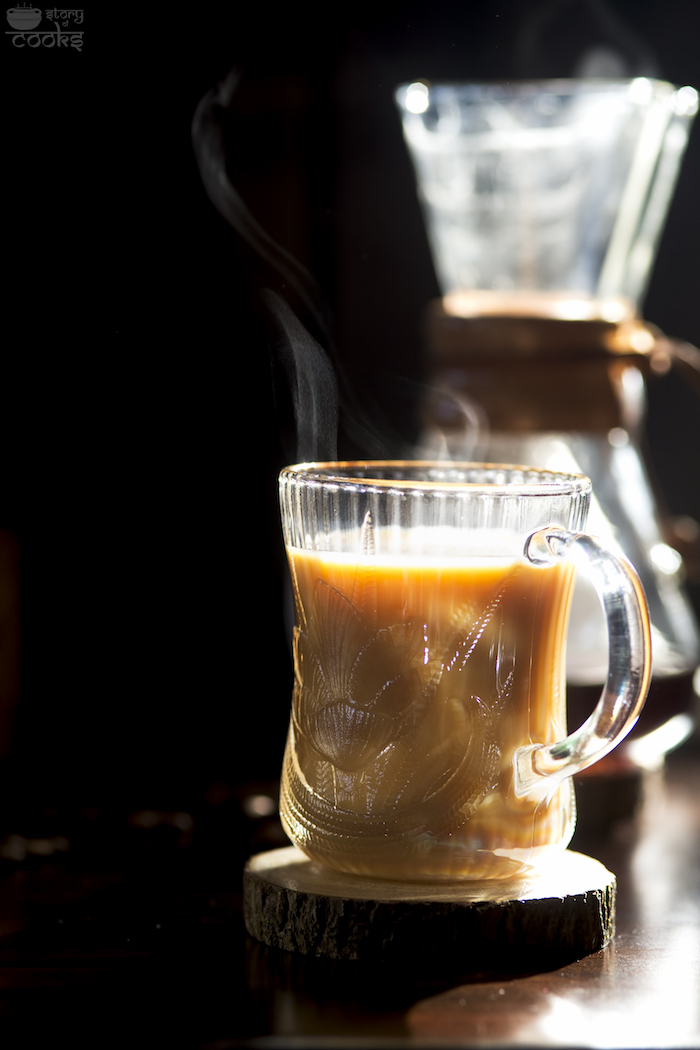
- 1 o clock angle: My favorite! Light is coming through left or right and you put a reflector in the path of the light and take pictures of your subject. You can create amazing steam shots with this light like this one. In my opinion it creates so much shadows and drama.
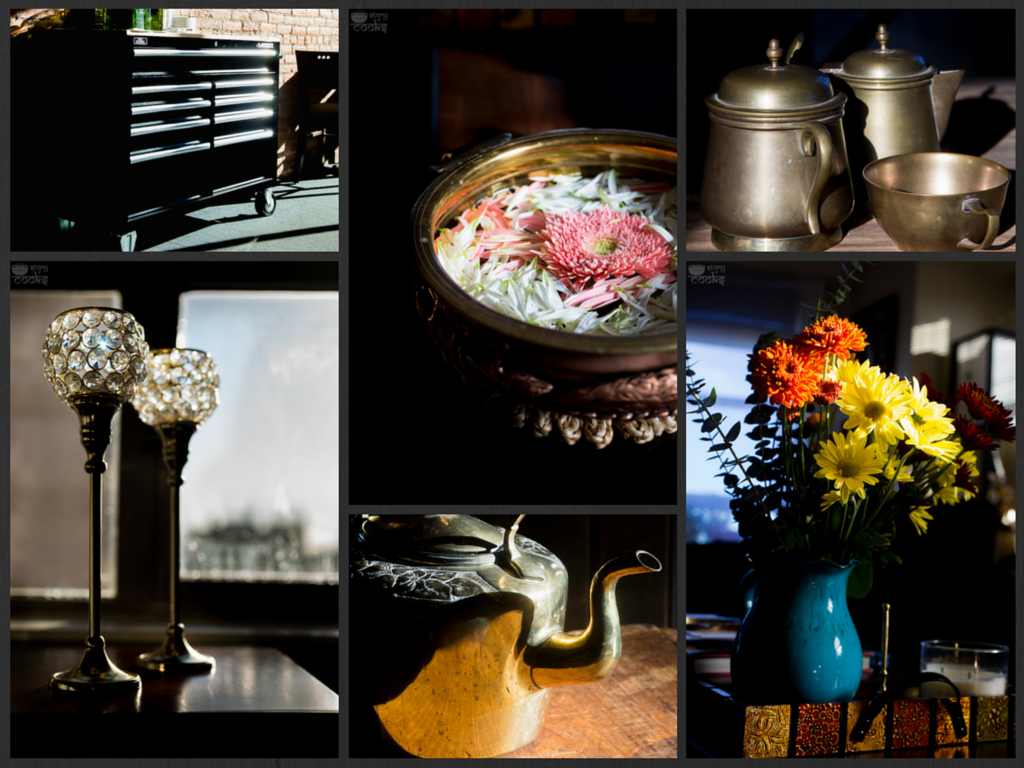
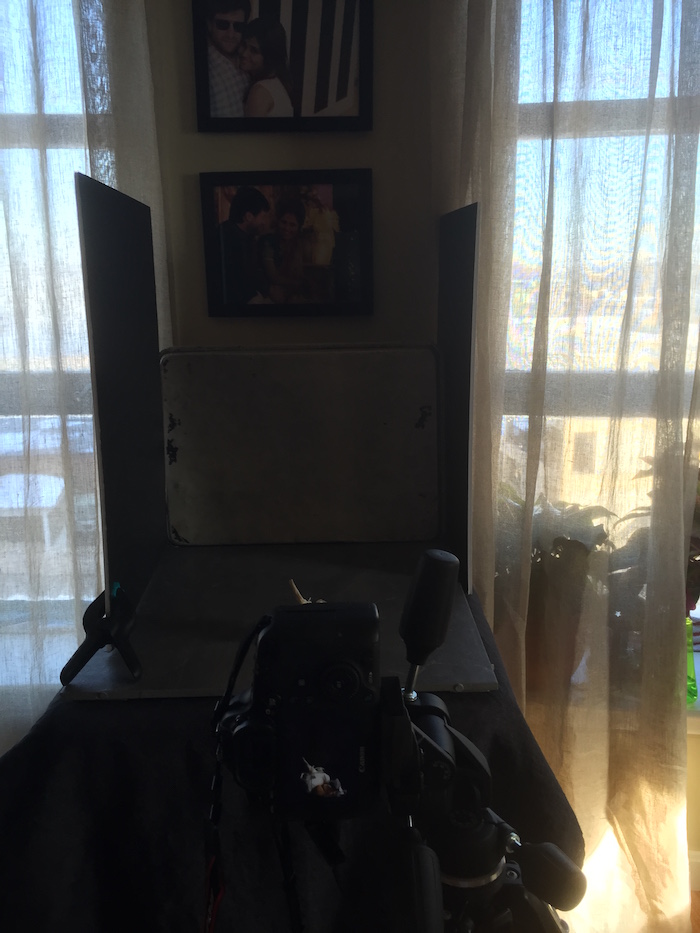
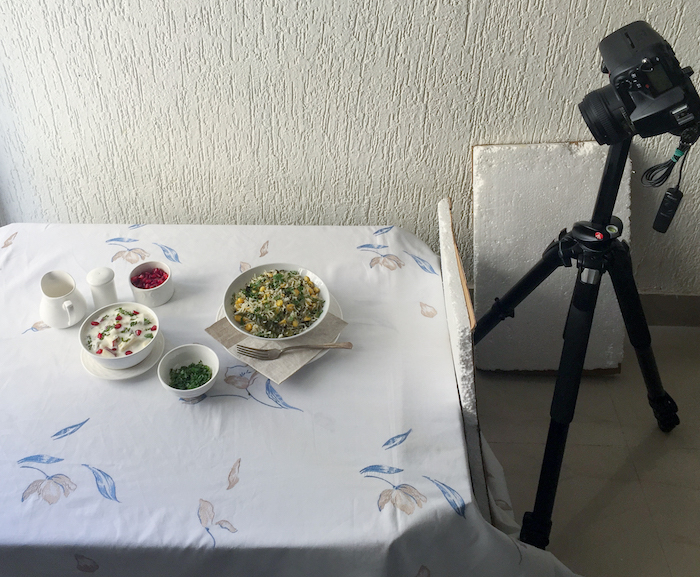
Some of my behind the scene pictures taken through my Iphone.
[ezcol_1half]
[/ezcol_1half]
[ezcol_1half_end]

[/ezcol_1half_end]While writing this article, I decided to reach out to some amazing photographers who create beautiful food photography through their gears. I asked them to pen down their workflows, share behind the scene photographs and the final photographs.
Food Photography: Simi with Natural Light:
There is not much to say here and probably that is the reason it took me 2 or maybe 3 weeks to write this for Dolphia. I did not know what to write. Well ….let me at least try.
First, I need some freshly brewed coffee and some good music….all that talk about coffee, wait stay here am getting a cup.
Now Dolphia does not drink coffee and am not sure how she is still on my friend list …hope to convert her one day.
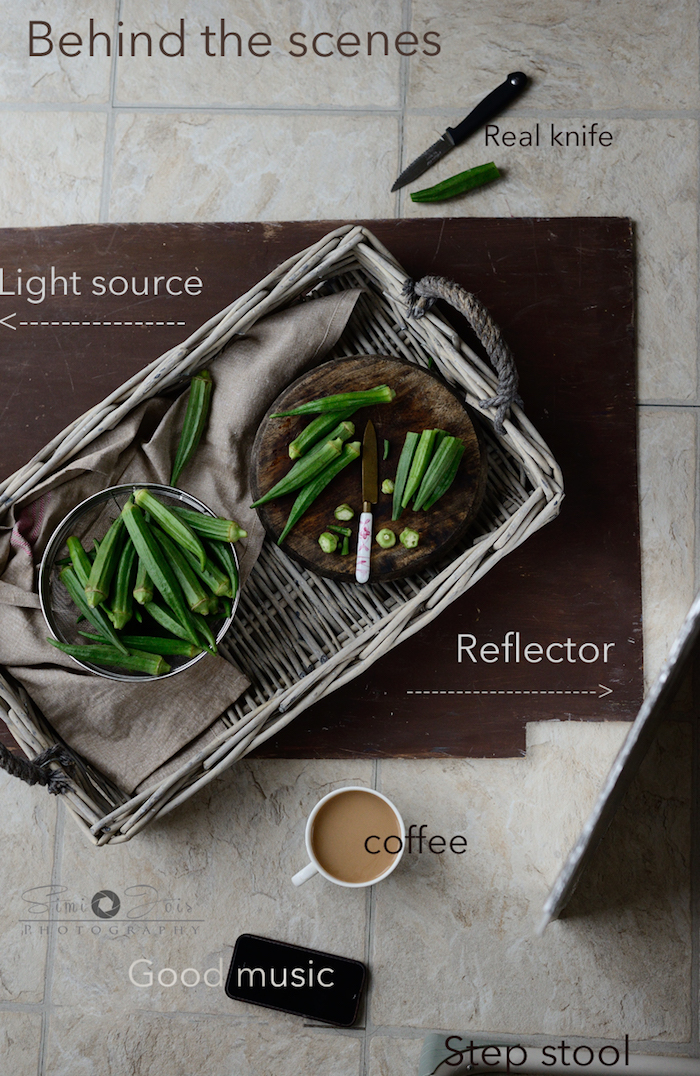
There is not much to my setup. I visualize which direction I want the light from, place my subject and style it, then take a few shots, add reflectors or light blockers and shoot.
Here is a step by step.
1- look outside the window…see the light…ponder a bit.
2- brew coffee
3- turn music louder
4- arrange props
5- take a few test shots with no food
6-add reflectors or/and blockers to manipulate light
7- take few more shots
8- bring food and realize it does not look as good
9- rearrange props, change angle, add more props, remove some
10- click
11- take a few more in different style – get more coffee
12- pick the best
13- edit
Some subjects give you a hard time, while some …it comes naturally.
That’s it ! hope this did not disappoint you ! There is no magic or formula to it..it’s pretty mundane.
Food Photography: Farrukh with Natural Light:
I remember that stage of blogging when I switched to a DSLR, it took me almost 3 months to get a hang of the camera and was clueless about how do I control light. Natural light is all that I have and would always prefer for my food shots. Then it was me roaming around every corner of the house with the setup to figure out what is the best position and angle of the light coming in. The shots went behind the sofa, under the window, on the dining table, next to the bed, inside the kitchen and what not. After multiple trials and numerous failures, I got my heaven for photography. There it was lying in the corner of the bedroom just adjacent to the door. Well, this worked for me based on the geography and structure of our apartment, you will have to find the right place for yourself. Explore! Explore and Explore![ezcol_1half]
[/ezcol_1half] [ezcol_1half_end]

[/ezcol_1half_end]Lighting is indeed the most important aspect of food photography. This is the first thing you have to consider coz all the rest lines up to it, be it your composition, camera settings, mood and even the final image processing. Once you have excelled in understanding what is the right place and the right time to shoot you can then work on shooting from different positions and angles to get the gamut of lighting variance to play with.
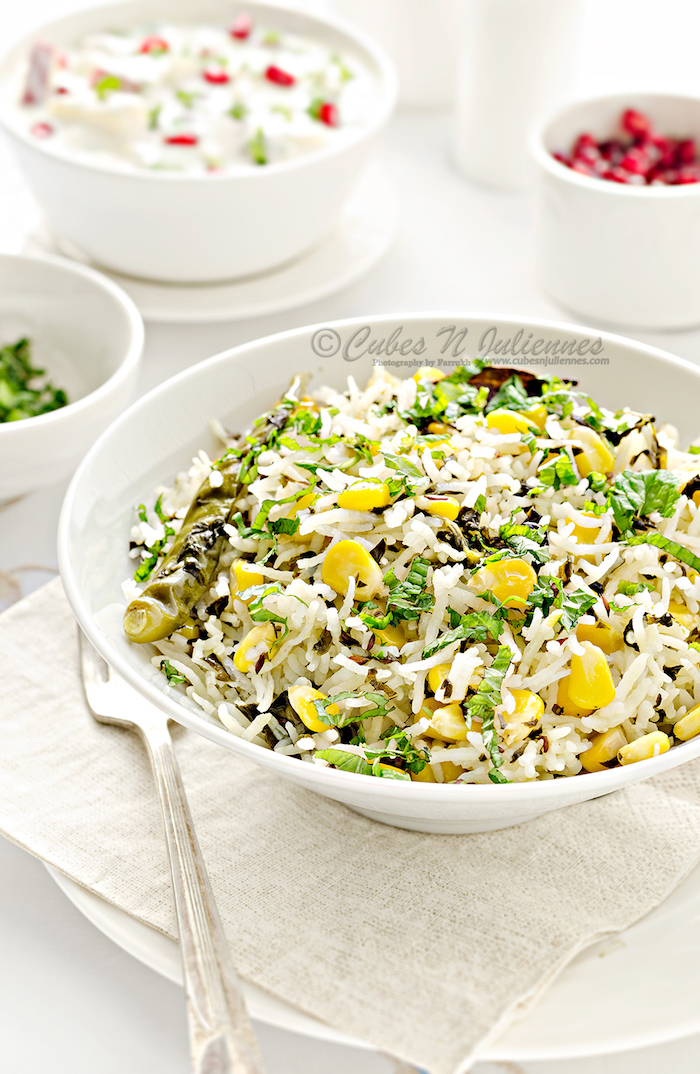
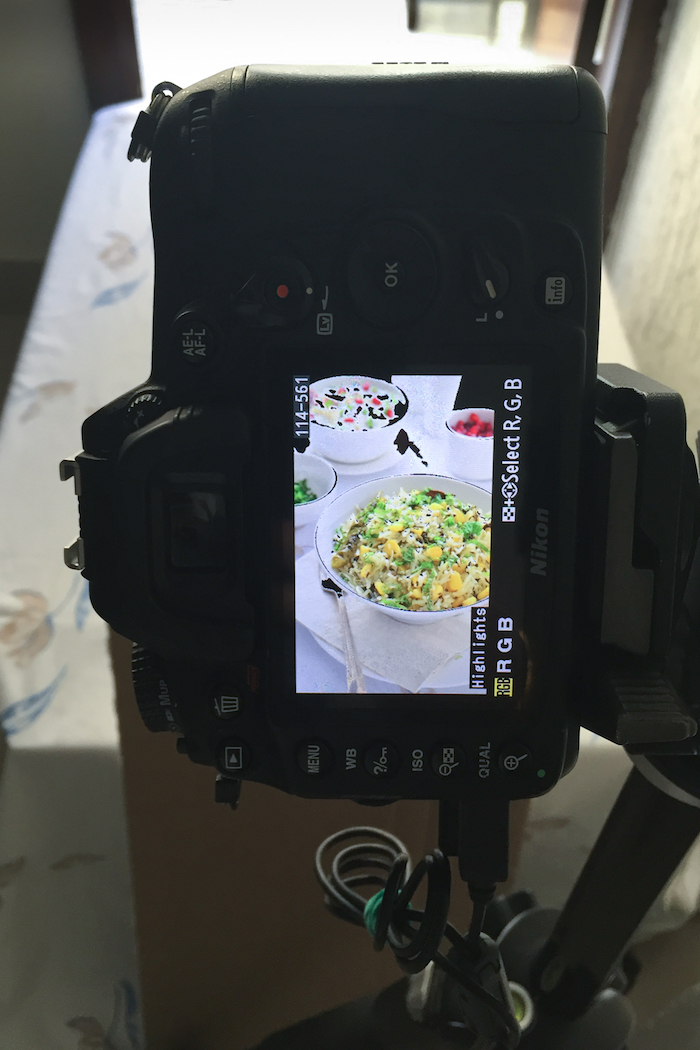
The image shown below is my setup for a backlit high key shot. It has been shot Nikon D7000 with lens 50mm f/1.8 G camera and settings are as below:
ISO:125
Shutter Speed: 1/20
Aperture: f/7.1
As this shot was a high key shot, the only extra thing I needed here was a piece of foam board at 6 o’clock to fill the shadows.
Food Photography: Bart with Artificial Light:


More information about the photographs from Bart:
Food Photography: Meeta’s behind the scene:
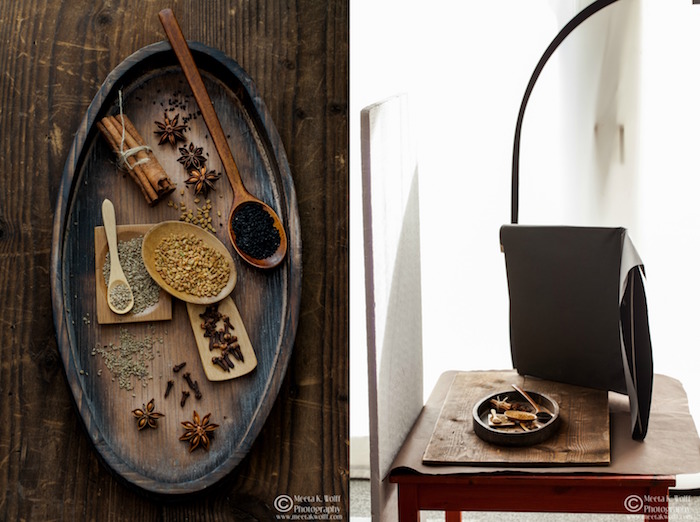
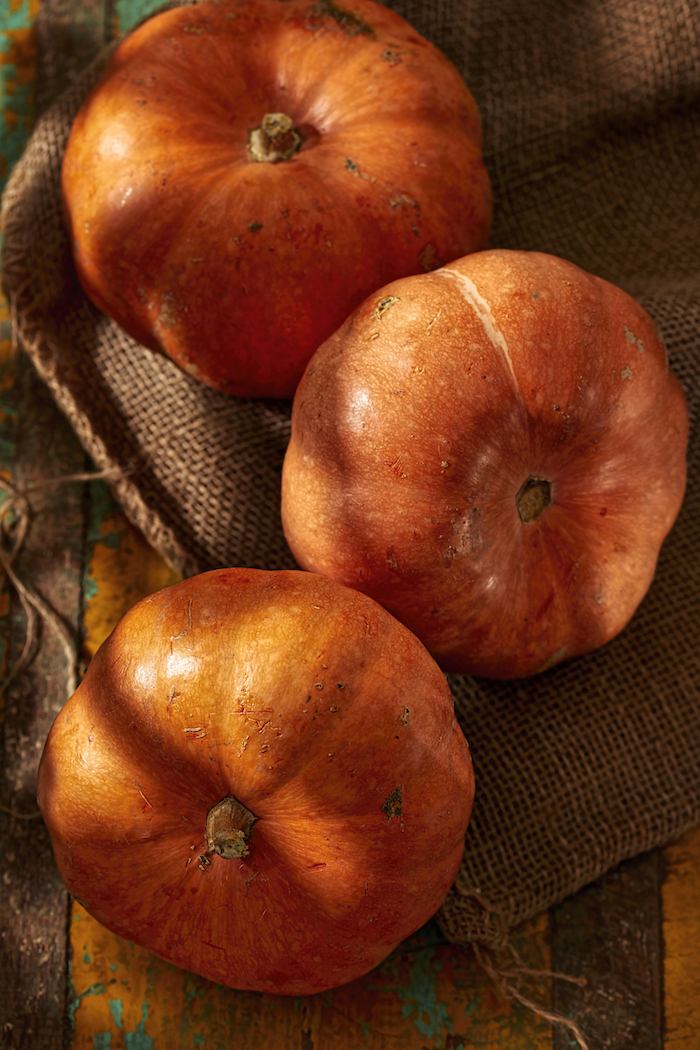
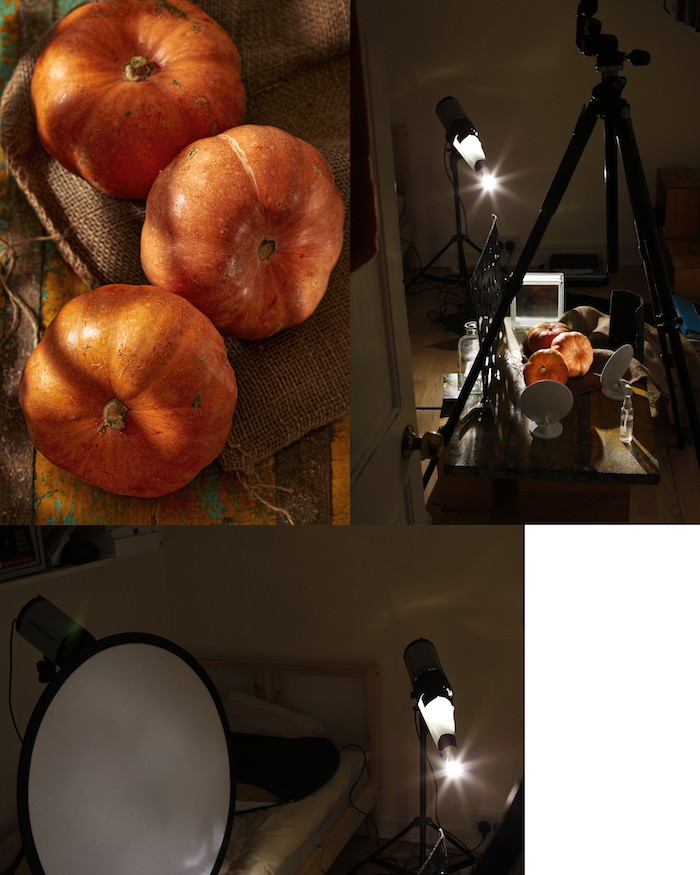
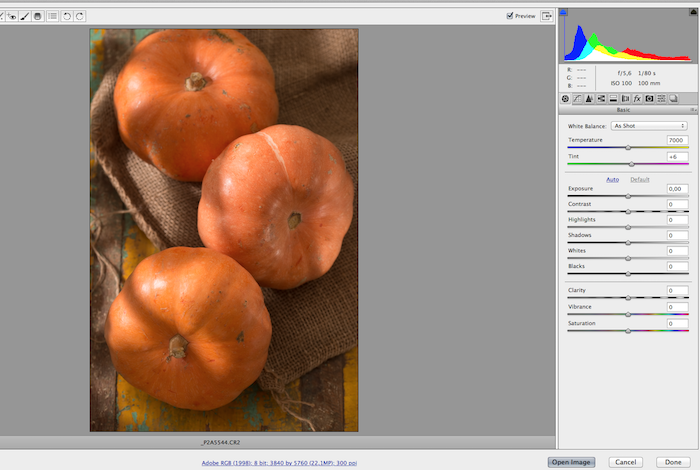
Image details: f/8 // 1/15 sec // ISO 100 // 100mm macro Light details: natural and very diffused light form the back. I placed black card around 1 to 3 o’clock to absorb light and a foam board on the left. Styling details: The tones of the spices inspired my color scheme. I kept the colors of my props in the muted tones of browns. I used the shapes of the props to define each spice and the oval tray to frame all of them. The overhead angle of the entire frame worked best to show the effects, the shapes and textures perfectly.

One of the best and informative post on light and photography Dolphia. So glad to see behind the scene pictures of some photographers I admire a lot. Hugs to you..
Its a good read. What I try to take care while photographing anything, that not to overexpose my image. And if that happened, editing helps.
Very informative post. Though I know how to handle my camera, light was big deal, after lots of photo shoots I have realised where to manipulate light, it’s the spot to choose and practice , which is helping me a lot
Hello Dolphia, hello all. Thanks for including me Dolphia and nice to be in company of girls work I follow. It’s quite a journey just like life, photography is seperate chapter for all of us and it has to be about evolving cause otherwise we get stuck and can get boring pretty fast – so it’s all about keeping pushing forward.
Simi how could I forget about including music? I am with you on this one – Britney and Bond themes or anything dramatic always help lol
Thanks again hope some people will find it useful.
Hugs and greetings to everyone
Bartosz
To be a photographer(food specifically) one needs to understand light first. And what a wonderful job you guys have done here showing us behind the scene photos. Love this post Dolphia. And thanks for bringing in all of my favorite photographers together to show us how they do it. Best part that I loved the most is obvious, behind the scene pics from all you guys. Thanks for sharing. You guys rock!
I enjoy Behind the Scene posts and it always inspires me to understand why and how?
Fab job of bring them in one pot.
Wonderful post.
Amazing post Dolphia. Thanks for sharing all of your tips and tricks for capturing light. Seeing the behind the scenes photos is always so exciting and informational. Thanks again for taking time to do this awesome post.
Thank you Dolphia for such a wonderful post….Study the light is the main mantra in food photography and here you have covered it beautifully…..still gluing the pictures to absorb them….
Thanks to all the wonderful and multi talented bloggers to share their ‘behind the scenes’, tips on capturing light. Really kind of you Dolphia, to share such a useful post. I will have to read it multiple times to absorb all the details.
P.S : DSLR is still my dream. I photograph with my mobile and such posts are so inspiring to go for one.
Thanks Dolphia for the wonderful post. Behind the scenes posts are always fascinating… And more so if it comes from people you admire the most.
You guys are Awesome. Thanks All 🙂
Fantastic to see light through the eyes of different fellow photographers although we all follow it and capture it we work differently with it. Thanks for including me !
Loved the post Dolphia!! I too run around in my house with my camera and tripod to get the best light. Its a big issue in my house. By the time I am done with cooking of the food, the light might have traversed to the other side of the house..lol.. Loved the behind the scene shots of all the amazing photographers.
What an informative post this is 🙂 Thanks to you, Dolphia and all the other talented photographers to share your inputs with everyone 🙂
Such an informative post Dolphia .Thanks for sharing the behind the scenes aspects of lightening and photography.I am a beginner in photography and this post will help me a lot in learning .Bookmarked the post to go through several times.
Very informative post Dolphia. Enjoyed reading it and learning from it. Hopefully will be able to apply it.
Such an useful post Dolphia – Sreelatha
Absolutely informative. I have bookmarked this article since I’ll be coming back here time and again until I get it.
Thank you!
Very helpful information.. Thanks for sharing !!
Loved reading this post and seeing behind the scenes. Thanks for bringing so many awesome photographers together it really helps to understand each one’s thinking better.
For Barty : oh how I miss you and your images, you are one amazing artist. I have been a fan of your work from ages. And yes without music, I can’t do much ….and coffee too.
Dol : this is one fabulous post ! Loved the way you broke it down and had some of us write for it. I’m honored to be in this company. Though I miss my dear friend Deeba here, maybe you can add her’s in next post version 2 🙂 just a recommendation. I would love to know her work flow.
Thank again !! U rock girl
This is really wonderful, Dolphia!
Thanks much ladies for this tutorial. I appreciate your efforts.
Very informative post. Amazing. Between can I get more details about the coffee cup picture with steam? Is it natural lighting with dark background or can I know behind the scenes. ? TIA
very inspiring…
Such an informative post and behind the scene pictures are always very useful in understanding the setup. Thanks for doing this post.