
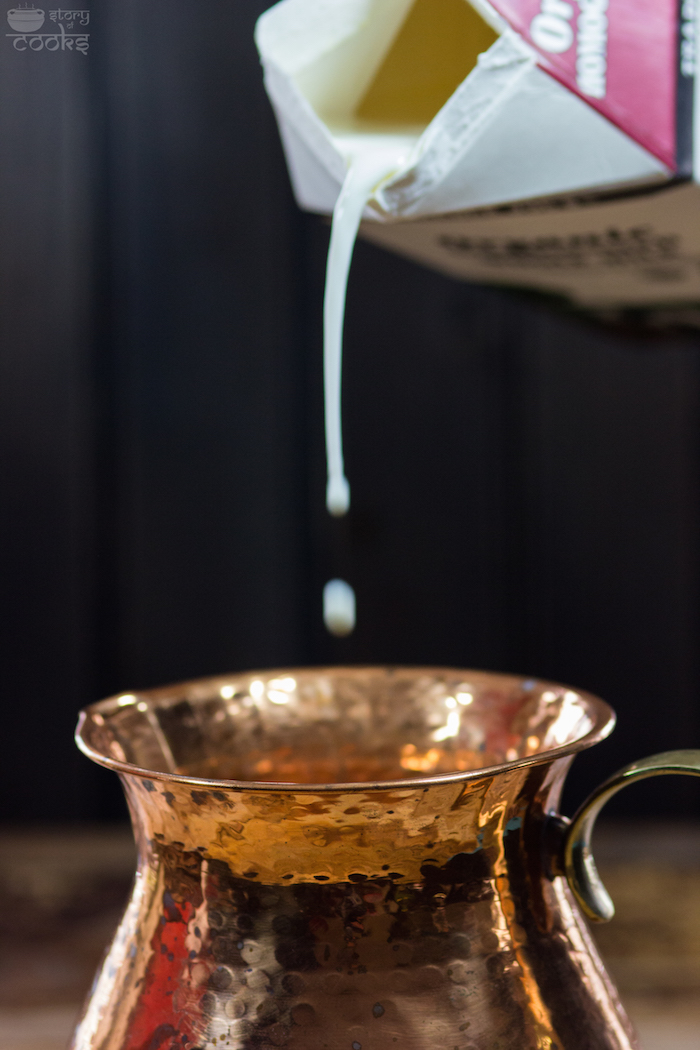
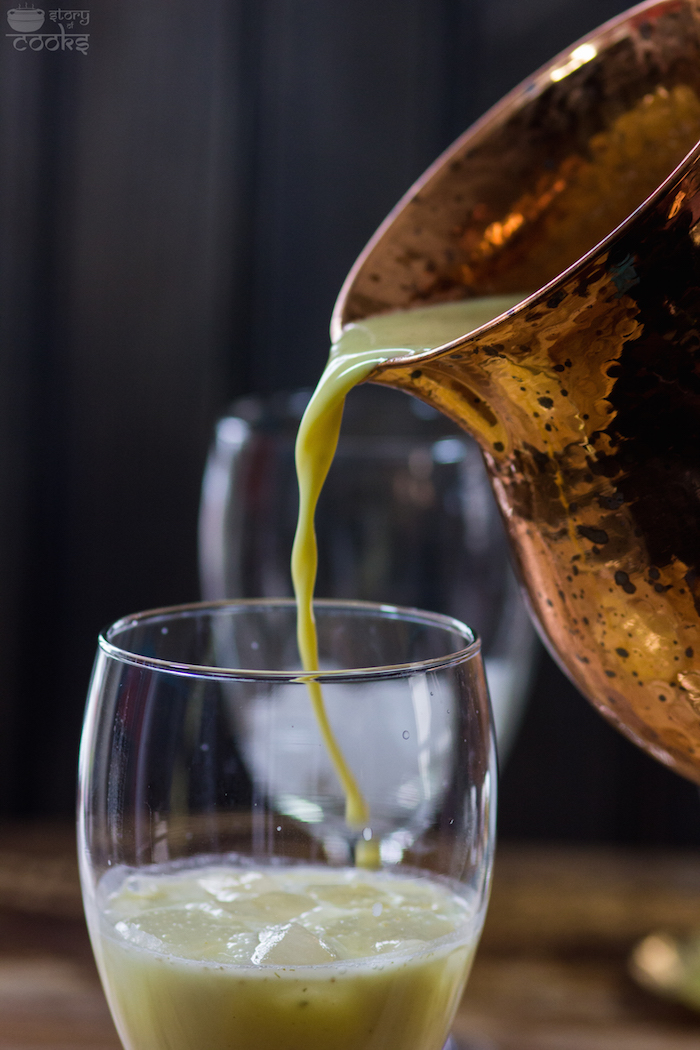
I love to challenge myself. A few days ago, I checked Simi’s post on Horchata and the beautiful way she shot the motion. I was intrigued. After searching for more information about the technique I came across a site called ‘a brown table‘. In his blog Nik does motion shots in almost every post. First, I tried it with flour while making savory cookies for my husband. It did not turn out well because there was too much light in the background, but not enough on the subject. I was shooting in my kitchen where there is not much natural light.

Then I tried to capture sprinkles of lemon juice falling on top of chicken kebabs. Motion shots require a much higher shutter speed than stills. If you have insufficient light you cannot simply raise your shutter speed, so I moved my kebabs onto a table. The shot came out terrible because my beige wall is a poor backdrop in the theater of falling lemon juice.
After showing a food photographer the person advised me to never take motion shots again and learn more about light and my camera instead. But I did not stop after hearing this critique. Simi once told me to “take everything with a grain of salt” so I was determined to continue practicing motion shots until I became perfect!
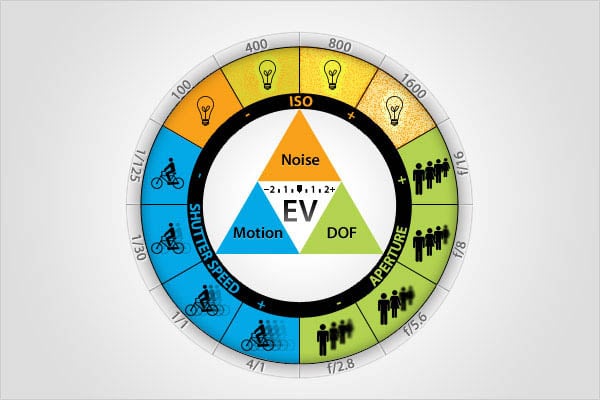
After a while I learned that in order to shoot motion, steam or any sort of action, you need an understanding of the three important pillars of photography: ISO, aperture and shutter speed. I must have read hundreds of articles and books before they became clear to me. I am going to share what I learned and the helpful diagrams I always keep on my phone for reference.
ISO (International Standards Organization): Do you remember back in old days when we used to have film cameras? ISO or ASA means sensitivity of the film to the light of those cameras. For digital cameras, it determines the sensitivity of the image sensor.
It typically starts at 100 and goes as high as 51200(in canon). The lower the number, the less sensitive your camera is to light and the finer the grain. That being said, you need to know what ISO setting is best for you. I’ve shot images at 100, 200, 400, 800 and 1200. I’ve found that as soon as it crosses 800 the image gets grainy.
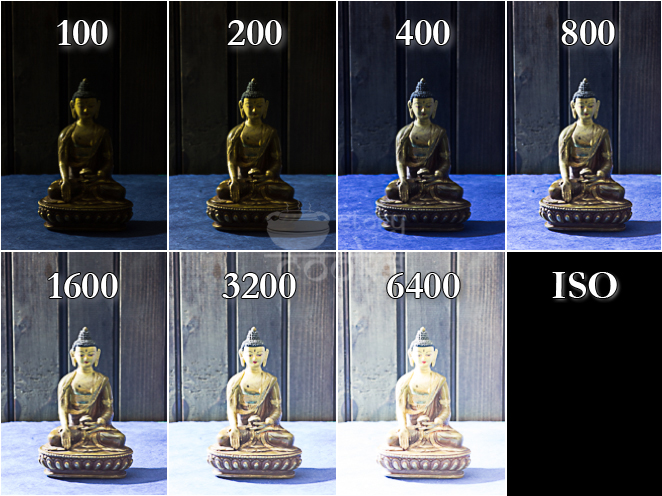
It’s not that I won’t go beyond that setting, but if I do I have to use the noise reduction filter in LR. This technique will soften the photo but it is a way to sacrifice sharpness for motion clarity when conditions are less than ideal. However, as a food photographer I do not like this compromise. I aim for crystal clear and sharp pictures.
Let’s recap.
Higher ISO = more sensitivity to light = better ability to shoot in darkness

Why you need a higher ISO will be explained at the end.
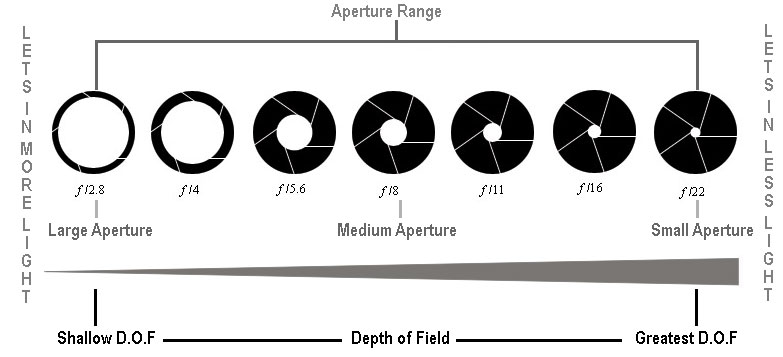
Aperture: An aperture is very similar to the pupils in our eyes. It is the opening through which the light travels into the camera body. Think about your eyes. The larger the pupil, the more the light enters the eye. Then, the relationship between aperture and pupil is:
large pupil = large aperture = shallow depth of field
small pupil = small aperture = greater depth of field
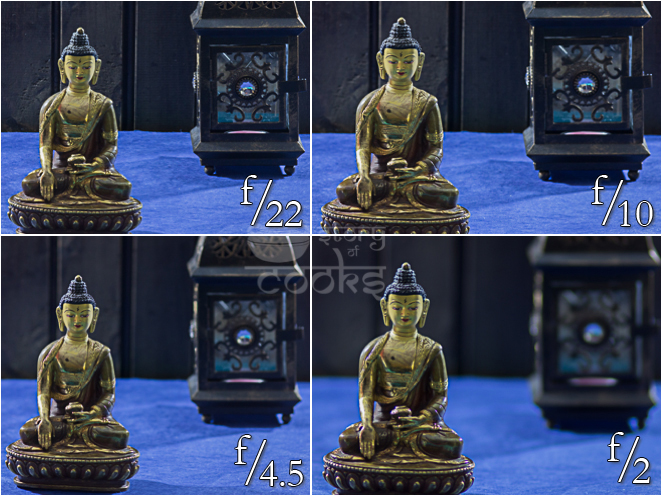
The aperture in a camera is usually calibrated with F-stops. Whenever someone tells you about the F-stop he or she is talking about aperture. A lower F-stop means a shallow depth of field, which means a blurry background and your subject strike out. It is perfect for portraits or food photography or when you want to blur out the background. Higher F-stop settings (5.6 or greater) means larger depth of focus–everything in your background will be crystal clear. I use the higher settings when shooting top-down because I want to show everything in my frame.
In F-stop jargon f/2 and F2 are semantically equivalent.
The following diagram shows the depth of field relative to aperture size.
How does it relate to ISO?
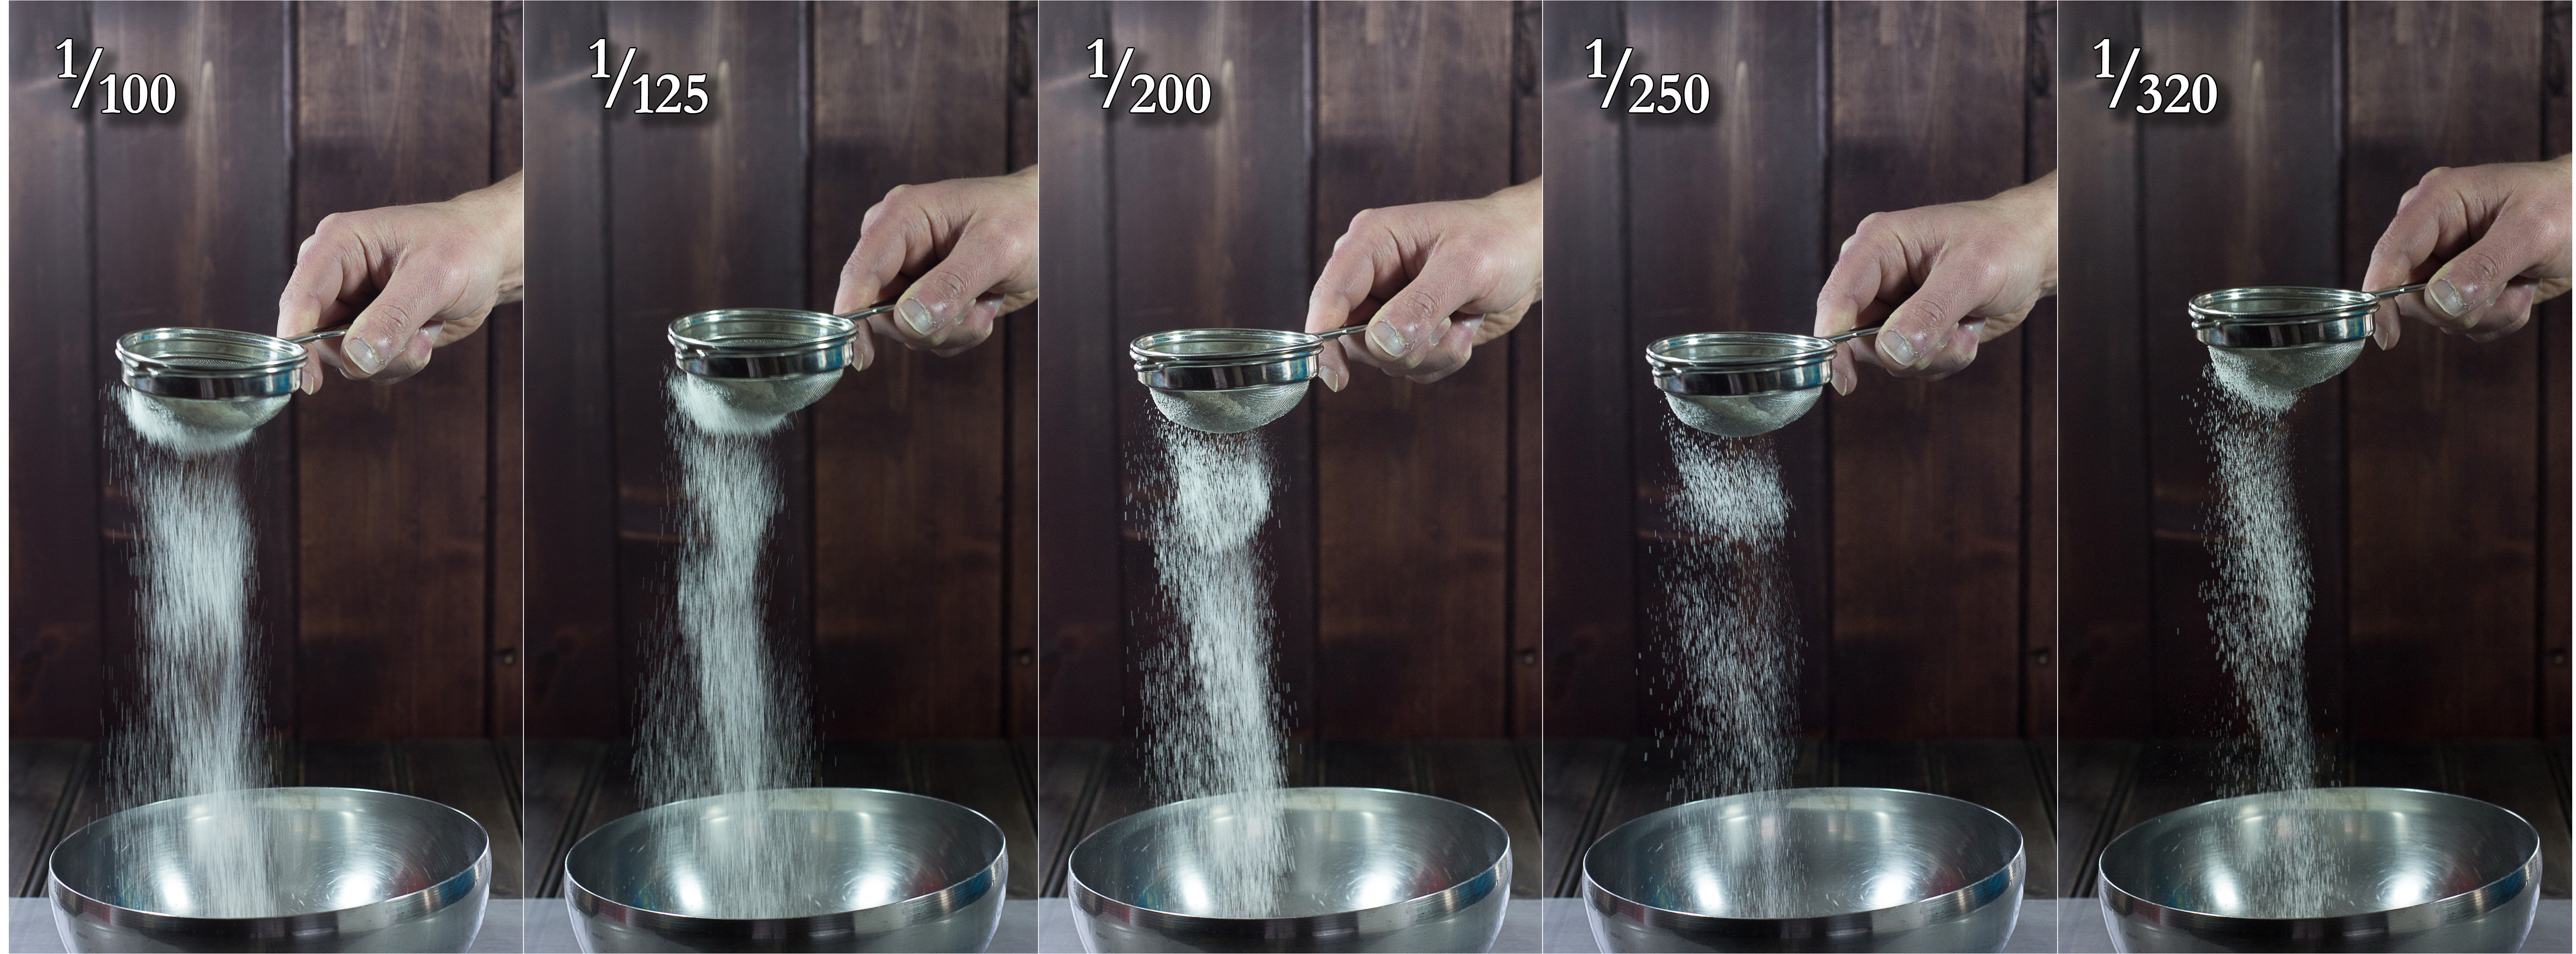
Shutter Speed: The paradigm of photography is shutter speed. Shutter speed is ‘the amount of time that the shutter is open.’ It is always measured in seconds or fractions of a second. For example, 1/250 is faster than 1/100 because a shutter open for .004 seconds is faster than one open for .01 seconds. The bigger the denominator, the faster the speed. For anything less than 1/60 I have to use a tripod otherwise my camera will start to pick up even the tiniest shake in my wrist.

How are ISO, shutter speed and aperture related?
If you do not have a lot of light what should you do? You should decrease your shutter speed in order to get enough light on your subject. Let say you do not have a tripod and, therefore, limited to 1/60 (for my equipment) shutter speed. What will you see? Your subject will be dark so you bump the ISO. But you cannot get the ISO beyond 800 (again, for my equipment). So the only option you are left with is decreasing your aperture. You can get it to F/2, but your subject’s background (or parts of it) will be blurry. See diagram below:
How do we fix this?
When I am shooting food I am at home and use a tripod. Most of my shots are at 100 ISO; F4 to F5 aperture, and the shutter speed varies from 2 seconds to 1/3 seconds. Because of the tripod I do not have to worry about my camera shaking. But when I am at a restaurant I cannot bring the tripod. In order to shoot the photo I bump the ISO to 1600 and shutter speed to 1/100 secs. The photos come out grainy but I’m okay with that because I’m not publishing them anywhere.
Last but not least–lets talk about motion or steam photography. In order to capture motion, you have to shoot very fast. Steam can be captured at an 1/80 second shutter speed but for better motion, you have to go beyond 1/150 (like 1/250 or faster). When I shoot at 1/250 second, in order to get the light I bump the ISO to 800 or get enough lights to keep it at 200. Sometimes, in addition to natural light, I use studio lights. I keep the aperture between F4 and F4.5.
The diagram from petapixel is a good reference.
In case, you want to download the cheat sheet diagrams:
ISO image source :https://cdn.tutsplus.com/photo/uploads/legacy/287_meterviewfinder/PerfectExposure-3.jpg
Aperture image source: http://colesclassroom.com/wp-content/uploads/2013/12/camera-aperture.jpg
Triangle Picture : http://petapixel.com/assets/uploads/2012/10/graphic.jpg
I wrote everything together in one post. If you want I can go into depth in separate posts. Let me know.
A great tutorial for beginners. I am thrilled and feel the excitement you are feeling as this was the same process I went through many years ago. Patience is the best virtue here and I wish you all the best!
Thank you Meeta. Comment from a food photograhy instructor and expert like you means a lot to me. I am saving money for courses 🙂 One day I probably enroll in one.
Its indeed a great tutorial for beginners. I have still not tried capturing motion /steam. The day will arrive soon.. Patience & Practice is the gateway to achievement.
you are already doing so great dear. proud of you 🙂
This is really good for beginners.You are motivating me to do more now . Practice and patience is what I trust. Hope to reach there soon.
Hi Dolphia,
Have left comments to your earlier tutorial too but never got a response! Nevertheless I thanked you there too and reteriating here! I am a beginner and trying to learn! The earlier tutorial on white balance was such a help and so is this one! This will be my bible from now on! couldnt have been explained simpler than this!
A big thank you!
Cheers:)
wonderful post…. Absolutely loved it <3
I am sorry Sanchari, for not replying. I am glad that my articles are helping you so much. I will try to write more to help the newbies. I learnt(and learning) hard way, so try to help the others who are doing so. Love.
Thank you Farrukh 🙂 Comment from you mean a lot to me. Love you
Thank you Sujatha, yes practise is the only one key in photography. Keep shooting 😉
Dolphia this is a very interesting article, you could teach photography because the way you explained, here, some aspects it’s really clear and accurate!
kisses from Italy
Laura
XOXOXO laura 🙂 Thank you for your kind words. Teaching photography is so far, when I am still learning. Can’t wait to see you at Italy 🙂
Hi Dolphia,
Very glad that i came across your post through fb and this is such a wonderful tutorial, simple and self explanatory information… This inspires me to explore more on photography …. Thanx a zillion bunch for sharing with us… 🙂
You’re welcome Chitra. Keep shooting 😉
Hello Dolphia,
This is a great article. Few months back I got Nikon D3300 and started taking pics. At the start I had no clue. Few days back I started shooting in Auto ISO mode. Via Sujatha I came to know about your blog recently. Though I read some articles on these 3 pillars, I couldn’t get a clear picture. You have explained everything very clearly. Such a wonderful article. Thanks, keep inspiring 🙂
I am glad to know that my article is helping others. Thank you for your generous words 🙂
Hie Dolphin
This is an amazing article..has inspired me to pick up my husband’s camera and start clicking nonstop….
I have just not surprised my folks but I am myself in absolute meh…
followed your article. ..tried all settings. .all permutations and combinations. ..have clicked few really good pics..but my only problem is most of them come out really dark…
help please!
Hello,
It’s great to know that my post is helping you. I am also delighted to know that you picked up the camera 🙂
What is your ISO, shutter speed and aperture?
Thanks for your reply…
firstly I need to mention that I use canon…n in that I go for M mode…guess that’s manual mode…that’s the only mode that allows me to set all the three settings that you had mentioned(aperture, ISO ans shutter speed ) in the above post. .
and in aperture setting generally I can’t go below 4.5
with shutter speed 1/80 and ISO depends..if low it’s too dark around 250 amd if high too grainy n white around 3200…and above
I have just shifted from India so I still have my tripod to reach here…hence can’t adjust my shutter speed below1/80..
I would like to share my clicks so that you see them and correct me n my settings…only if you permit….
thank you once again…your post means a lot….
Sucheta, you can send me your pictures in my email storyofcooks@gmail.com.
You are constrained by two factors – Aperture and Shutter Speed. I myself do not go less than 4.5 even if I can go till 1.4. When the aperture is limited, you can play with shutter speed. In most of my pictures, my shutter speeds are a couple of seconds. That being said, I always shoot on a tripod. As you can’t go beyond 1/80, the only option you have is to bump the ISO. And the result is grainy pictures. Well you can reduce the grains by Topaz lab or Lightroom. Hope it helps!
hi dolphia…nice post ,recently i brought dslr and iam practising in manual mode but some of my images are coming so blur , can u tell me the reason why its happening it would be great helpful for me
Wow wwwwwww..u r too good in coking n clicking.. ☺ Lovely n very useful article for me.. I love to do photography.. Bought new Dslr..But don’t knw how to use?? I hope it will definitely help me.. Pls share if u have written any other article.. Thxx
How can I join this blog.
You can join my newsletter.
Yes, you can find them under the photography tab on the menu.